Introduction
PNG (Portable Network Graphics) is a popular image format known for its lossless compression and support for transparent backgrounds. However, PNG files can be large, slowing down website load times. The challenge is compressing PNGs without losing quality to maintain visual integrity while improving performance.
In this guide, you’ll discover:
- Why PNG compression matters
- Compress PNG Without Losing Quality
- Best tools to compress PNGs losslessly
- Manual techniques for reducing file size
- Common mistakes to avoid
Why Compress PNG Files?
PNG files are larger than JPEGs due to their lossless nature. Large images can:
- Slow down websites, hurting SEO rankings
- Increase bandwidth usage, affecting user experience
- Occupy excessive storage on servers
Compressing PNG without losing quality ensures faster load times while keeping images crisp.
Can You Really Compress PNG Without Losing Quality?
The short answer: Yes, absolutely! But there’s an important catch—you need to use the right approach. Here’s what makes PNG compression different from other formats:
Why PNG Compression Is Unique
- Lossless by design: Unlike JPEG (which permanently discards data), PNG compression works like a ZIP file – it finds smarter ways to store the same visual information
- Two optimization paths:
- True lossless: Removes only hidden metadata and unnecessary color data
- Smart lossy: Some tools (like TinyPNG) use barely noticeable quality tradeoffs
When Quality Stays Perfect
You’ll maintain 100% original quality and compress PNG without losing quality when:
✔ Using tools like AnyToolz
✔ Converting 24-bit PNGs to optimized 8-bit
✔ Removing EXIF metadata and color profiles
✔ Resizing to exact display dimensions first
When Quality Might Change
You might see tiny differences when:
⚠ Using “smart lossy” tools (AnyToolz)
⚠ Aggressively reducing color palettes
⚠ Compressing already-optimized PNGs multiple times
Pro Tips: Compress PNG Without Losing Quality
For web use, consider WebP format – it often outperforms PNG
Always compare before/after with a zoomed-in view
Start with true lossless tools before trying “smart lossy” options
Best Tool to Compress PNG Without Losing Quality
AnyToolz.com – Advanced Image Compressor
Looking for the easiest way to compress PNG files without losing quality? AnyToolz.com offers a powerful yet simple solution for optimizing your images while preserving their original sharpness and clarity.
Key Features of Compress PNG without losing quality:
✅ Lossless PNG Compression – Reduce file size without sacrificing quality
✅ Ultra-Fast Processing – Compress images in seconds
✅ Batch Processing – Optimize multiple PNGs at once
✅ Multi-Format Support – Works with PNG, JPG, JPEG, WEBP, and GIF
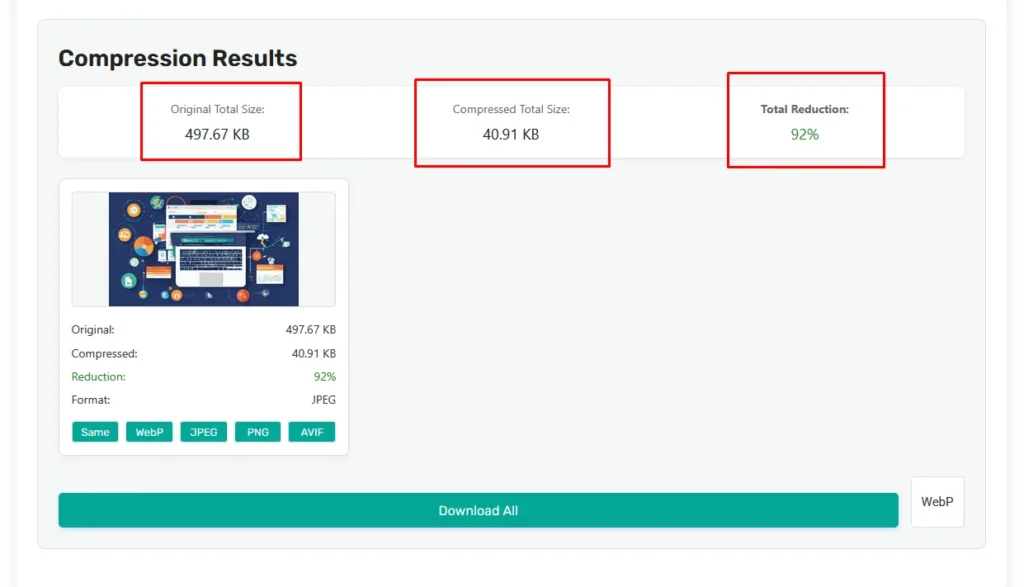
✅ Up to 98% Size Reduction – Dramatically shrink files while keeping visuals intact
Why Choose AnyToolz.com?
- No quality loss – Unlike some compressors that degrade images, AnyToolz uses smart optimization to keep your PNGs crisp. And It’s Compress PNG without losing quality.
- User-friendly – Just upload, compress, and download—no technical skills needed.
- Free to use – Get professional-grade compression at no cost.
How It Works:
- Upload your PNG (or multiple images)
- Compress with one click
- Download your optimized files
Whether you’re a web developer, designer, or blogger, AnyToolz.com helps you speed up your website, save storage space, and maintain stunning image quality.
Try it now and see the difference!
Manual Techniques to Reduce PNG File Size
1. Resize Images to Exact Dimensions
- Why? Larger dimensions = unnecessary pixels = bigger files
- How?
- Use Photoshop/GIMP (Image → Image Size)
- Online tools like PicResize or BulkResizePhotos
- Pro Tip: Check your website’s display size first
2. Switch to 8-Bit PNG Format
- Best for: Logos, icons, simple graphics
- Avoid for: Photographs (can cause banding)
- How to convert:
- Photoshop: *Save for Web → PNG-8*
- Free tool: PNGQuant
3. Remove Hidden Metadata
- What’s removed: Camera data, software info, timestamps
- Tools:
- ExifTool (command line)
- ImageOptim (Mac) or FileOptimizer (Windows)
- Saves: 5-20% file size
4. Reduce Color Palette
- How it works: Fewer colors = smaller files
- Best tools:
- PNGGauntlet (automatic)
- Photoshop Indexed Color Mode (manual control)
5. Replace PNGs with SVG When Possible
- Ideal for: Logos, icons, simple shapes
- Benefits:
- Tiny file sizes
- Perfectly scalable
- Conversion tools:
- Vectorizer.io (automatic)
- Illustrator/Inkscape (manual)
Pro Tip: Combine these methods for best results – resize first, then optimize colors and remove metadata.
Bonus: For website graphics, consider using CSS instead of PNGs for simple elements like borders and backgrounds.
Image Converter Tools: Free Image Converter
Common PNG Compression Mistakes to Avoid
Compressing PNGs seems simple, but small errors can ruin image quality or leave you with unnecessarily large files. Here are the most frequent mistakes—and how to avoid them:
1. Using Too Much Lossy Compression
- Problem: Some tools (like TinyPNG) use “smart lossy” compression that removes subtle image data
- Result: Visible artifacts, especially in gradients or detailed areas
- Fix:
- Always compare before/after versions
- For critical images (logos, product photos), stick with true lossless tools like PNGGauntlet
2. Not Previewing the Compressed Image
- Why it happens: Automated tools make compression seem instant and foolproof
- Risk: Discovering quality issues only after uploading to your website
- Smart workflow:
- Use tools with side-by-side previews (Squoosh, Compressor.io)
- Zoom in to check edges and fine details
3. Ignoring Better Formats Like WebP
- PNG isn’t always best: WebP offers 30% smaller files at similar quality
- When to switch:
- For photographs: Use WebP (lossy)
- For transparency: WebP (lossless) still beats PNG in file size
- Exception: If you need universal browser support (some older devices don’t support WebP)
4. Skipping Compression Entirely
- The irony: High-res PNGs straight from cameras/design tools are often 5-10× larger than needed
- Hidden costs:
- Slower page loads → Higher bounce rates
- Increased hosting bandwidth usage
- Simple rule: No uncompressed PNGs on websites—even “small” images add up
Bonus Mistake: Wrong Export Settings
- From Photoshop? Avoid “Quick Export as PNG”—it doesn’t optimize
- Better choice: “Export As” → PNG with “Smallest File Size” checked
Pro Tip: Bookmark one online tool (like AnyToolz) and make compressing PNGs your final step before uploading any image.
PNG vs. Other Formats: When to Use What?
| Format | Best For | Compression Type |
|---|---|---|
| PNG | Logos, transparent images | Lossless |
| JPEG | Photos, complex images | Lossy |
| WebP | Modern web images | Lossy/Lossless |
| SVG | Icons, vector graphics | Scalable |
For the best balance, consider WebP—it offers superior compression with minimal quality loss.
How to Compress PNGs for WordPress
- Use a Free Image Compressor( AnyToolz )
- Optimize Uploads Automatically
- Enable Lazy Loading
- Use a CDN (e.g., Cloudflare)
Conclusion
Compressing PNG files without losing quality is essential for faster websites and better SEO. By using the right tools (TinyPNG, PNGQuant) and techniques (resizing, color reduction), you can significantly reduce file sizes while keeping images sharp.
Key Takeaways:
✔ Use lossless compression tools
✔ Resize images before uploading
✔ Consider WebP for better performance
✔ Avoid over-compressing
Compress PNG without losing quality today for a faster, more efficient website!
FAQs
Q: Does compressing a PNG reduce quality?
A: Not if done correctly. Lossless compression retains original quality.
Q: What’s the best free PNG compressor?
A: AnyToolz has great free options.
Q: Is WebP better than PNG?
A: Often yes—WebP offers smaller file sizes with similar quality.
Q: How much can I compress a PNG?
A: Typically 30-98% without visible quality loss.
By following this guide, you can compress PNG without losing quality and boost your site’s performance effortlessly! 🚀